Sunday, April 30, 2017

Install Dell OMSA 8.1 in ESXi 6.0 and add to OME

Dell OMSA

http://en.community.dell.com/techcenter/systems-management/w/wiki/1760.openmanage-server-administrator-omsa#Download_OMSA850

http://www.virtualizationhowto.com/2015/05/install-dell-omsa-81-esxi-60-add-ome/

Install Dell OMSA 8.1 in ESXi 6.0 and add to OME


Recently, after upgrading a Dell Cluster to vSphere 6.0, one of the tasks that I wanted to accomplish was to install the new Open Manage Server Administrator or OMSA in my newly upgraded Dell R620’s and then add those servers to the Open Manage Essentials server that is monitoring my current environment.  The process is very straightforward and not too difficult to accomplish.  Let’s look at how to install Dell OMSA 8.1 in ESXi 6.0 and add to OME.
Download and Install OMSA 8.1
First things first, you will need to download and then install the OMSA 8.1 VIB package on your compatible Dell PowerEdge server.  To do this, navigate to http://www.dell.com/support/home/us/en/19/Drivers/DriversDetails?driverId=FN2KW and download the VIB package.  Once you have the VIB package, you need to copy the installation package over to your ESXi 6.0 server via SSH/SCP.  I use WinSCP which works fine.  Any free SCP program will do the trick.  I like to copy one off files like this to the /tmp directory.
***Note*** Before installing the software, make sure that you vMotion off any running VMs to another host in your cluster as the install process will require a reboot.  Place the host in maintenance mode as well.
The VIB will come in a .zip format.  You do not need to unzip the VIB package to install it.  This is taken care of in the esxcli command that we will issue to install the package.  Once you have your file copied over and then you have established an SSH connection into your server, from the command line, type the following command below to install the OMSA 8.1 package:
Once you type this, your server may appear to be hanging on the command or at least it did on my R620’s that I was installing on.  However, give this a few minutes at least before deciding to do anything drastic.  You should eventually see that the package installed successfully and then a prompt asking you to reboot.
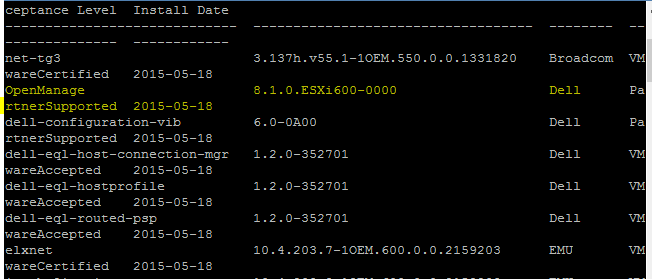
Once you see the reboot prompt, simply type reboot at the command line to initiate the reboot.  After the server has come back up and is online, you can issue the below command to verify the installation of OMSA 8.1 was successful:
The listing should look similar to the below, with the VIB OpenManage Partner Supported 8.1.0.ESXi600-0000 package listed.
omsa01-300x128 Install Dell OMSA 8.1 in ESXi 6.0 and add to OME
Testing the OMSA install
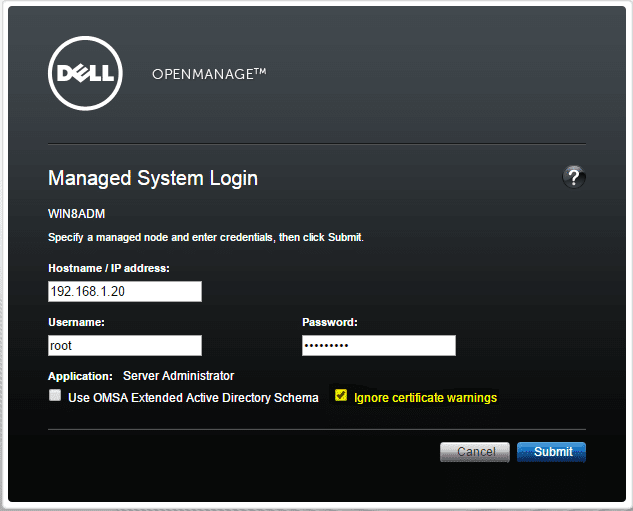
One of the easiest ways to test and make sure your OMSA install on your ESXi 6.0 host is functioning, is to download the OpenManage Server Administrator Management Workstation and install this on a workstation computer.  This package allows you to connect to your ESXi 6.0 host and perform basically the same functions that OME will perform against the server.  To download the management workstation, click this link:  http://www.dell.com/support/home/us/en/19/Drivers/DriversDetails?driverId=20V28
After downloading and installing this 64bit package on your workstation, simply add your IP address and credentials.  Also, it is important that you check off the ignore certificate warnings in the login box as highlighted below:
omsa02-300x242 Install Dell OMSA 8.1 in ESXi 6.0 and add to OME
You should successfully be able to connect to the ESXi 6.0 host with this process.  Once you have verified this, you are ready to add to your OME server.
Adding the ESXi 6.0 hosts to Open Manage Essentials (OME) Server
Login to your OME server console and navigate to the Discovery and Inventory tab at the top.
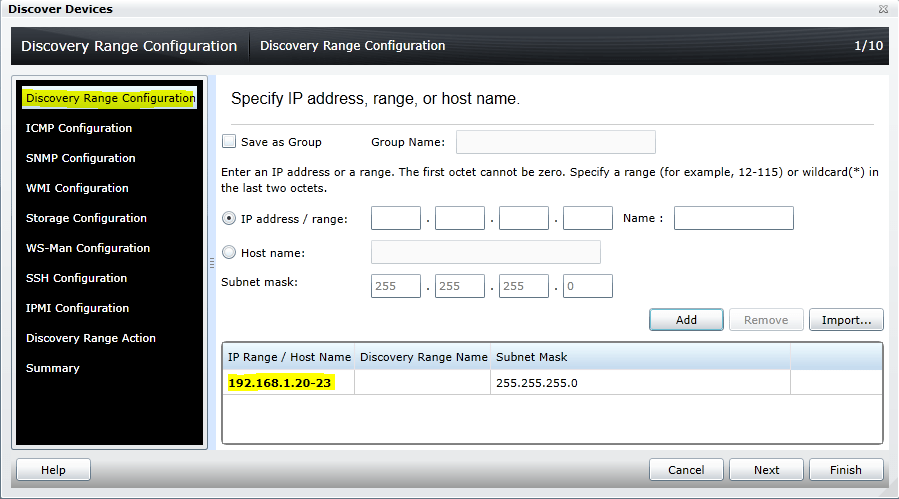
  • Right-click on the All Ranges menu and you will get the Add Discovery Range popup

The Discover Devices Wizard will launch.  Plug in your Discovery Range Configuration IP range values
omsa04-300x167 Install Dell OMSA 8.1 in ESXi 6.0 and add to OME
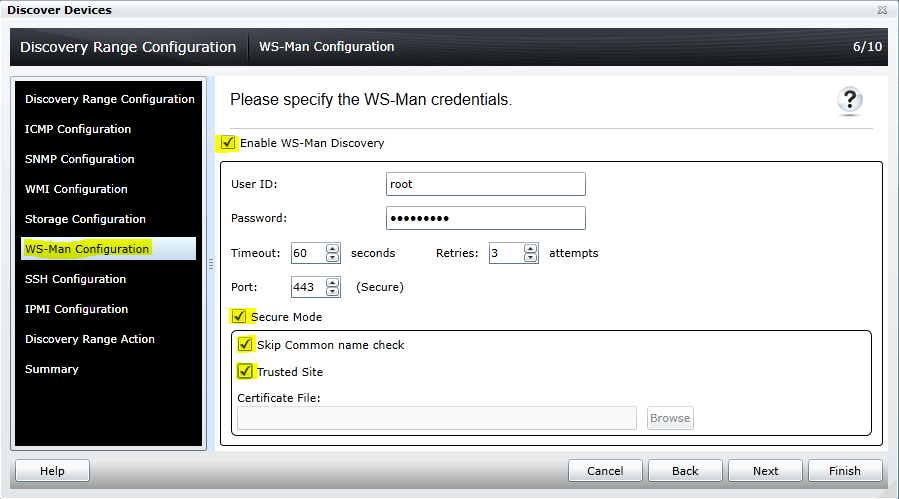
The only other configuration screen you need to pay attention to in adding your ESXi 6.0 hosts, is the WS-Man Configuration.  Make sure you check off:
  • Enable WS-Man Configuration checkbox
  • Secure Mode checkbox along with the:
    • Skip Common name check
    • Trusted Site
  • Checking those values will allow OME to deal with an invalid certificate, etc.
omsa05-300x167 Install Dell OMSA 8.1 in ESXi 6.0 and add to OME
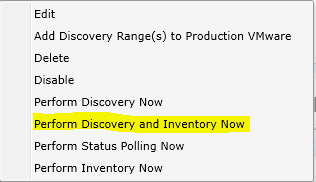
After this, right click on your newly created Discovery Range and choose to Perform Discovery and Inventory Now option.
omsa06-300x173 Install Dell OMSA 8.1 in ESXi 6.0 and add to OME
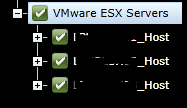
Once the Discovery and Inventory is complete, you should see your hosts underneath your VMware ESX Servers drop down under your devices.
omsa07 Install Dell OMSA 8.1 in ESXi 6.0 and add to OME

Final Thoughts
It is an extremely good idea to install the OMSA VIB on your production VMware ESXi hosts if they are Dell servers as this allows you to peer into the current hardware health.  Open Manage Essentials is a great add on piece (for free) that allows real time monitoring and alerting of all OMSA enabled servers in your environment.  For free, it is a hard solution to turn down if you are a Dell shop.

Wednesday, April 19, 2017

Resize Vmare Linux disk

https://www.pluralsight.com/blog/tutorials/resize-vmware-linux-drives

There are potential issues that you can encounter when working with Server 2012 virtual machines, especially around resizing drives. Using vSphere 5.1, ESXi 5.1 host, and VMware tools with Red Hat Enterprise Linux 6.4, I wanted to start a discussion on how to resize drives in Linux.

Using a simple example

When I resized Server 2012 drives in VMware, I chose to work with a 40 GB base disk. I'm going to go with a 20 GB drive this time around.
linux drive 1
I did a pretty basic install of RHEL, but most importantly, I chose to set up my system using Linux logical volumes for my disks, which is the default. I had to customize my setup because I chose to define two logical volumes for / and /home, and placed them in a single volume group.
For someone new to Linux, or that hasn't worked with other logical volume managers, this terminology might be completely new to you. Describing the Linux logical volume manager is beyond the scope of this post, but I hope everyone is able to follow along and maybe learn something new.
When learning something new, I definitely like to try to get comfortable with a visual representation when possible, and to show things here. I wouldn't have a problem with going through everything at the command line, but I wanted to try to show things somewhat visually.
I actually needed to dig around a bit to find a graphical user interface (GUI) that would allow me to view logical volumes in RHEL. Again, just for the purpose of showing something, I decided to install the "system-config-lvm-1.1.12-15.el6.noarch.rpm" package from the RHEL DVD. This provides a GUI to Linux logical volume. The package is still included in the base DVD, but based on some research, is now no longer maintained.
Once I fire up the Logical Volume Manager (LVM) GUI, I see the following graphical representation of my current system, which shows the single volume group, and three logical volumes: /, /home and swap.
linux drive 2
I will also increase the size of the single virtual disk by 5 GB (up to 25 GB). This is a pretty simple exercise and I covered how to do this briefly in an earlier post.
Once I did that, if I immediately go to the LVM GUI, I don't see any difference. Even if I re-open LVM or go to “View” and “Reload,” I still don't see any changes to the virtual disk inside the RHEL VM. I could just reboot the system and that should fix the problem, but rebooting isn't always an option. Furthermore, if I can resize in Windows Server 2012 without a reboot, I'd like to see RHEL be able to do the same thing.
So, I'm going to use the fdisk command to see what the disk layout looks like in RHEL.
linux drive 3
Without getting into the whole "bits vs. bytes" thing, I can see that /dev/sda is “21.5GB” which is my 20GB disk I originally created.
Now, I'm going to use some fancy magic to force RHEL to rescan for SCSI disks. Just by writing a ‘1' to a special file, this will force RHEL to rescan.
linux drive 4
There's no guarantee that the “2:0:0:0” path will be the same on every system, so this is something you will have to review once you've checked what's in your /sys/class/scsi_disk directory.
Now, if I run fdisk again, I now see that my initial disk is now 26.8 GB, which means RHEL now sees the full-size 25 GB disk that I resized.
linux drive 5
If I go back to LVM now, I will see a new “Unpartioned space” section show up.
linux drive 6
From this point, there's two ways one can go ahead and use this extra space. Without introducing even more LVM terminology, I'm going to go with the option that the Linux community seems to agree on being the “safer” way to do things.

Creating a new partition

Next, what I'm going to do is set up this new unpartioned space by creating an entry in the partition table for it. In this case, I'm going to define it as a primary partition and give it the next available number which is “3” in this case.
linux drive 7
Above, one very important thing to do is to set the partition type to “8e” which is “Linux LVM” as shown above. If you miss this step, the process of adding the partition to LVM could cause major system problems, so be careful to not miss this important step in this scenario.
The value I used for the “first cylinder” is basically the next available number based on the previous fdisk output that shows that partition #2 ends at cylinder 20480.
The last step after having created a partition and setting the type is to write the changes to the partition table.
Attempting to write the partition table causes a warning message about doing a reboot, but also indicates that running partprobe can be done instead.
linux drive 8
Unfortunately, partprobe doesn't work in my case, so I'm going to reboot the system to avoid any issues. I don't want to reboot, but I'm being cautious in this case to make sure I don't cause any corruption.
After a reboot, if I open LVM to check things out, I now see that my un-partitioned space now looks different, and possibly usable.
linux drive 9

Volume group modification

Now, if I move on to the next thing, I need to do a few things in LVM to use the new partition. I'm going to go with the command-line for a bit, and try to display some visual information along with the commands I'm running.
First, I'm going to use the command “vgdisplay”, which is like “volume group display.” Based on the options chosen when I installed RHEL, the default volume group is named “vg_rhel6” in this case.
linux drive 10
The important thing to note above is the VG Size value of 19.51 GiB. Now, I'm going to use the “vgextend” command (volume group extend) to modify my volume group to use the new partition that I just created.
linux drive 11
Just after extending the volume group above, I did another vgdisplay, and how I see the VG Size is now increased to 24.50 GiB.
To see what I've done so far, a peak at LVM shows what I have now.
linux drive 12
Above, I see that a new “Unused Space” section is now showing in the logical view of my volume group.

Logical volume modification

Now that I've added more unused space to the volume group, I need to modify my logical volume to use this new space.
I'm going to use the “lvextend” command (logical volume extend) to increase the size. In this case, I'm going to look at extending my / file system first, so I'll modify the underlying logical volume.
linux drive 13
Above, I chose to use 4999M instead of 5G because the latter would return an error about not enough space being available. I'm not going to get into the specifics of these small calculations here.
I increased the logical volume above, but you may note that a second “df -h” command returned the same size for /. That's because one more step is required, which is to resize the file system that basically sits on the logical volume, as shown. Once the file system is resized, a final “df -h” now shows that my / is now increased by 5GB basically.
Wait a minute!
If I have a single disk, I wasn't able to resize a volume unless it was at the end of a disk. Linux doesn't have that limitation when using the new LVM (technically known as “LVM2”).
So, with LVM, I can resize a disk no matter where it logically sits. For example, I can also resize /home, which was at the end of my disk before I resized it.
linux drive 14
Again, I can resize a file system no matter where it seems to be on the disk.

Adding a second disk

Because of how LVM works, the earlier steps I would go through would also apply to how I would work with a second VMware “hard disk” added to the virtual machine. Instead of being seen as /dev/sda, it would be seen as /dev/sdb. I would still need to create a partition on it, extend the volume group, extend the logical volume and finally do another resize2fs.

Lesson learned

What I've gone through here with RHEL, is slightly different from what I encountered with Windows Server 2012.
I had limitations with Windows Server 2012 that no longer exist in RHEL, but remember that this is dependent on using LVM, otherwise, there are limitations that impact disk resizing, similar to the issues discussed in the Windows Server 2012 post, and I'll cover those issues in a future post.
The important thing to consider here, above all else, is the importance of using LVM. You may want to stick with using a multi-disk setup, by considering a volume group per disk for example, but it is optional in this case.
It's difficult to give the same clear guidance on best practices with RHEL as it was with Windows Server 2012, because RHEL with LVM is so much more flexible.
Remember, planning ahead can save a lot of headaches down the road.

Tuesday, December 27, 2016

Setup ESXi with AD authentication

Setup ESXi System for AD authentication

Add group to AD called 'esx admins' and populate with your administrators for esx

Add domain controllers to DNS

Go to DNS and Routing in Configuration tab

Set the DNS servers to AD controller IP's

Set the 'look for hosts in following domains' to your current domain


Now you need to change the NTP settings per this document
https://kb.vmware.com/selfservice/search.do?cmd=displayKC&docType=kc&docTypeID=DT_KB_1_1&externalId=1035833

once that is done follow these steps
https://kb.vmware.com/selfservice/microsites/search.do?language=en_US&cmd=displayKC&externalId=2075361
  1. From the vSphere Client, select the host that you want to add to the Active Directory.
  2. Click the Configuration tab 
  3. Click the Authentication Services.
  4. Click the Properties link at the top right pane.
  5. In the Directory Services Configuration dialog, select the directory service from the dropdown.
  6. Enter a domain.
  7. Click Join Domain.
  8. Enter the user name (in user@domain.com format) and password of a directory service user account that has permissions to join the host to the domain and click OK.
  9. Click OK to close the Directory Services Configuration dialog box.
You should now be able to login to the ESXi box using your AD users that are in the 'esx admins' group.

Monday, November 3, 2014

Easy Esxi patching

These are the sites I went to and the commands I ran.


Heere is a great site to get exsi patches without logging into vmware
https://esxi-patches.v-front.de/


esxi goto configuration page
choose security profile
enable esx shell and ssh

ssh into vmware server

run these commands

esxcli network firewall ruleset set -e true -r httpClient

esxcli network firewall ruleset set -e true -r httpClient
esxcli software profile update -d https://hostupdate.vmware.com/software/VUM/PRODUCTION/main/vmw-depot-index.xml -p ESXi-6.0.0-2494585-standard

esxcli network firewall ruleset set -e true -r httpClient
esxcli software profile update -d https://hostupdate.vmware.com/software/VUM/PRODUCTION/main/vmw-depot-index.xml -p ESXi-6.0.0-20160104001-standard

Reboot

esxcli network firewall ruleset set -e true -r httpClient
esxcli software profile update -d https://hostupdate.vmware.com/software/VUM/PRODUCTION/main/vmw-depot-index.xml -p ESXi-6.0.0-20161104001-standard

Reboot

6.0 update 3
 esxcli network firewall ruleset set -e true -r httpClient
esxcli software profile update -d https://hostupdate.vmware.com/software/VUM/PRODUCTION/main/vmw-depot-index.xml -p ESXi-6.0.0-20170202001-standard


Sunday, September 21, 2014

Linux service startup

http://www.linuxtopia.org/HowToGuides/services.html

How to find and configure the services which start when a Linux system boots up


A typical Linux system can be configured to boot into one of 5 different runlevels. During the boot process the init process looks in the /etc/inittab file to find the default runlevel. Having identified the runlevel it proceeds to execute the appropriate startup scripts located in the /etc/rc.d sub-directory.

For example if you have a runlevel of 5 configured then the init process will work through the list of startup scripts located in /etc/rc.d/rc5.d. These startup scripts start either with the letter "S" or "K" followed by a number and then a (hopefully) description word. For example the startup script for NFS (Networked File System) is typcically S60nfs whilst the stratup script for YUM system might be called K01yum.

Scripts that start with an "S" are invoked before those prefixed with a "K". The number in the filename controls the order in which the script will be executed with that group (either "S" or "K"). You wouldn't, for example, want to start NFS before the basic networking is up and running. It is also worth noting that the files in the rc.d sub-directories are not the actual scripts themselves but rather symbolic links to the actual files located in /etc/rc.d/init.d.

There are number of ways to control what services get started wihtout having to delve into the /etc/rc.d sub-directories yourself.

The command line tool chkconfig (usually located in /sbin) can be used to list and configure which services get started at boot time. To list all service settings run the following command:

    /sbin/chkconfig --list

This will display a long list of services showing whether or not they are started up at various runlevels. You may want to narrow the search down using grep. For example to list the entry for the HTTP daemon you would do the following:

    /sbin/chkconfig --list | grep httpd

which should result in something like:

    httpd           0:off   1:off   2:off   3:on    4:off   5:off    6:off

Alternatively you may just be interested to know what gets started for runlevel 3:

    /sbin/chkconfig --list | grep '3:on'

chkconfig can also be used to change the settings. If we wanted the HTTP service to start up when we at runlevel 5 we would issue the following command:

    /sbin/chkconfig --level 5 httpd on

A number of graphical tools are also available for administering services. On RedHat 9 you can run the following command:

    redhat-config-services

The equivalent command on RedHat Fedora Core is:

    system-config-services

The above graphical tools allow you to view which services will start for each runlevel, add or remove services for each runlevel and also manually start or stop services.

Another useful tool if you do not have a graphical desktop running or access via a remote server is the ntsysv command. ntsysv resides in /sbin on most systems. Whilst a convenient tool when you don't have an X server running the one draw back of ntsysv is that it only allows you to change the settings for the current runlevel.